Challenge 026 | Pipelines in Managed Environments
- 1 mrt 2024
- 13 minuten om te lezen
In part two of the Managed Environments series we will focus on Pipelines, which might be the single most important feature Managed Environments bring. The day after Pipelines were announced, I tested it and shared my thoughts in a LinkedIn article. It was already a promising product, but since then much has changed (in a good way). Enough reason to get a detailed view of what it currently has to offer.

Challenge Objectives
🎯 Learn about Pipelines
🎯 Know how to extend the Pipelines easily
🎯 Create assets to be added to the Catalog
Introduction
What is Pipelines?
If we want to explain Pipelines, we should start with explaining Application Lifecycle Management (ALM) briefly. If you are a so-called Citizen Developer, you probably start creating Power Platform assets in the Default or Personal Productivity environment after you came up with an idea. During the development you make sure that all the functionality is working as it should. Once finished, you start using the application. Because of your excitement, you show it to other colleagues, who might also start using the application. Now they come up with additional functionality. You start updating the application and after you publish your changes another colleague tells you something happened with the application. You have broken something when you wanted to make things better.
You might have had this experience yourself. At least I did. To prevent (or at least limit) this, you can set up ALM. For Power Platform, this means working with multiple environments and solutions. You will create multiple environments. The best practice minimum is three environments for dedicated purposes: Development where the features are added, Test where the functionality is tested, and Production where all users will consume your app.
Nowadays we can create three developer environments so that we can test these ALM capabilities.
Solutions are used to easily move the things you create around these different environments. In many cases you will need more than just an app to make your idea a reality (e.g. a Power Automate flow that is triggered from an app). You can put all these things in the solution (hence the name).
Although we can move a solution around, the question is how. Without anything set up we can do it manually in interface, or using the CLI. For both options, you will need environment maker permissions in the target environment (Test of Production from our example). This is a bit of a concern, as developers tend to put their update into production ASAP. If they can make their update in Production, you will know for a fact that this will happen.
Setting up a good ALM practice will therefor always require some sort of interface where the developer can submit their changes, which will kick off a deployment process. The process can contain approval steps, solution checker validation, checking for unmanaged layers, unpacking the solution to source code, etc. but eventually the solution must be deployed. Ideally, with a service account to make sure that developers can only get their solutions into production by following the predefined steps.
There are 2 main options for setting this up (besides doing it all by yourself), ALM Accelerator which is a separate module from the CoE Starter Kit, and Pipelines in Power Platform. We will obviously discuss the latter one. By the way, when Pipelines were announced, the developer still required environment maker permissions on the target environment. Last October Pipelines got an update and can now use delegated deployments using a service principal or service account. For me personally a reason to actively start rethinking our environment strategy.
So now that we know what it's for, we will take a closer look on how it works and what it does. I will sometimes compare it to the ALM Accelerator, as that is what I currently use for deploying solutions. There is no need to have experience with the ALM Accelerator. I will try to explain the pros and cons as if you haven't use either of the two.
Set up Pipelines
There is a dedicated Learn page on how to setup. Before you start, make sure you have at three developer environments ready in your tenant. You can create these in the Power Platform Admin Center. You will also need a host environment where the Pipelines in Power Platform will reside. You should see this host environment as the source where all versions of all solutions will be uploaded. For the sake of this demo is doesn't matter too much, but in a real world scenario you will probably make this a separate production environment.
Make Managed Environments
You will also need to make sure the target environments are Managed Environments. You can do that by selecting the target environment in the Admin Center and click Enable Managed Environments on the command bar. From the image below, Miguel Verweij's Environment will be both my dev and host environment (maybe another host environment would have been a better choice...). Test and Production will be the target environments, thus these must be Managed Environments. You can skip the Managed Environments setting options for now.

Install Pipelines for Power Platform
Then we will need to install the Pipelines solution. Luckily they made it into an AppSource package. This makes installing and updating it as simple as it can be.
Go to aka.ms/ppac > Dynamics 365 apps and search for Pipelines. Click on Power Platform Pipelines and Install it to the environment you want it installed.

Add deployment environments
Now we need to set-up the deployment pipelines. The first step is to add the Environments we wat to use. We do this in the Deployment Pipeline Configuration application that was installed by the previous step. For the development types we have two options: Development and Target environment. You can see my setup is just as we discussed earlier.

To use delegated deployment, we need an App registration.
Create Enterprise application
The documentation still states that users of Pipelines for Power Platform need access to all environments, including target environments. That probably is because delegated deployment is still in preview. We will just set it up to see how it works.
Go to portal.azure.com
Go to Microsoft Entra ID > Add > Enterprise Application
Name it Pipelines in Power Platform and make sure you select the Single tenant option
Register your Enterprise Application
Make sure you are an owner of the Enterprise application
Go to the App registration and select Certificates & Secrets > select New client secret. Make sure you save thee secret value. this is only shown once
Although stated on some blogs, you don't need to give the App registration Dynamics CRM API permissions. Thanks Luise Freese for schooling us developers on making things a bit more secure.
Go to aka.ms/ppac
Select your host environment and select the See all hyperlink under S2S apps from the Access section (see image below)
Select New app user > search for Pipelines in Power Platform (your earlier created App registration) > add the Deployment Pipeline Administrator security role.
Add the same App registration to your target environments, but with the System Administrator security role.

Create Pipeline
Back in the Deployment Pipeline Configuration app, we can create a new Pipeline.
Name your pipeline Pipeline for Challenge 026
Note the AI deployment notes. This is a Managed Environments feature and will use Azure OpenAI service to write the deployment notes for you. This sound really helpful as this is often not provided in detail. It is US only for now, but will roll out to move regions over time. I do wonder what the value will be for deployment notes. Based on the documentation, it will generate a solution overview, not the things that have changed fro the previous version. This will be helpful for generating app descriptions. Guess what, this is already a feature that is available. Again, US only.
Save your pipeline
Select your development environment on the Linked Deployment Environments subgrid
Create a new Deployment Stage
Name it Deploy to test > Select the Test environment at the Target Deployment Environment ID
Select the Is Delegated Deployment checkbox. If you won't it will run as the pipeline user, which means this user will need Environment Maker (in some cases even System Administrator) permissions in the target environment. If you have a service account you can select Stage Owner and make the service account the owner of the stage. If you want to use a service principal (App registration), select the Service Principal option. This option will show the SPN Client Id field, which is the Application ID from your App registration. Don't ask me why they mix terminology.
Remember that you added yourself as an owner of the Enterprise application? That's because every Deployment Stage owner must be an owner of the Enterprise application. That is something to consider when implementing this. Security groups is probably something that you will use in such a scenario.
The normal deployment stage without delegated deployment would be ready by now. But with delegated deployment, we need to create a Power Automate flow to do this. Fortunately, Microsoft created a sample solution with a flow in it we can customize. We do need to do a few thing before we can simply import that solution.
Set up Dataverse Service principal connection
The flow will use the regular Dataverse connector, but it will require you connect with the service principal. You've already been added as an owner of the Enterpise application, so we will only need to create a simple flow.
In your host environment, go to Flows
Create a new flow with a manual trigger
Add a Dataverse action (e.g. Add a new row)
Create a new connection. Instead of just signing in, select the Connect with service principal on the bottom left of the action.
Name your connection Dataverse Pipelines in Power Platform SPN
Enter the Client ID and Tenant ID that are available from your Enterprise application. The Client Secret is also required, so I hope you've saved it🤓

You can delete the flow without saving it.
Add a Mail-enabled security group
I will show the flow in detail a little later, but it will use the Approvals connector. This requires an email for approvers. You could have a Microsoft 365 group that is created when you create a new Team in Microsoft Teams, but in some cases, this is a bit of an overkill. To group people into and granting them access to certain resources, we normally use security group. But these don't have a mailbox. For these scenarios you could create mail-enabled security groups. More info can be found here.
Go to Recipients > Groups
Select Add new group and select the Mail-enabled security option
Name it Pipelines Delegated Deployment Approvers
Select yourself as the owner and member
Set the mail address to PipelinesDelegatedDeploymentApprovers and check the Require owner approval to join the group
Import the Sample Pipelines Delegated Deployment Flows solution
You can now install the sample solution in you host environment. Make sure you select the Dataverse Pipelines in Power Platform SPN connection we created earlier. If you have other connections already, it could be another connection is pre-selected for you. On the Environment Variables section enter the email address from your mail-enabled security group.
You now have two flows that will do some of the work. Let's start with inspecting the SPN Delegated Deployment Approvals flow. It starts with the When an action is performed trigger from Dataverse. This is a custom API from the Pipelines AppSource package you installed. You can find it in the Microsoft App Deployment Metadata managed solution. To be clear, this flow will be triggered for every deployment request. The flow is intended to auto-approve deployment stage that has UAT in the Stage name. We named it Deploy to test, so we can update it to Test. In all other cases, it will require an approval from the mail-enabled security group we created. Based on that approval, the deployment will go through, or not. Pretty clear. Make sure you save the UAT to Test update.

Now, lets push a random solution through this pipeline. You should see the flow has been triggered and auto-approved.

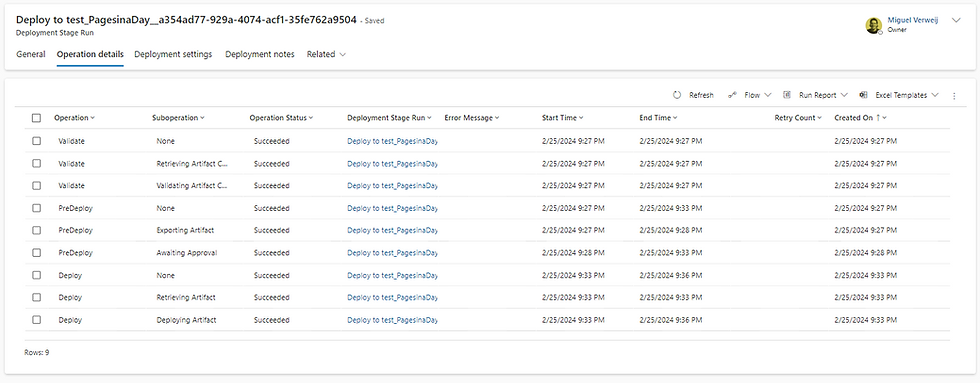
In the run history of this deployment, you can see all the conducted steps.
Once deploying Artifact has succeeded, your solution should be available in your test environment. It is under managed solutions (as it should).

Add production Stage
Now that the solution is deployed to test, we want to deploy it to production. As we've seen from the flow, it should have similar settings. Make sure you select the earlier created stage as the previous deployment stage.

You should now see the third environment on the Pipelines page.

Let's deploy it to production. Wait for the flow to start. You see an error? Me too.

The problem is that the requestor property is hard-coded to an email address outside your tenant. We will need to update this to the actual mail address of the requestor. The good news is that the second flow (which we haven't looked into yet) has exactly these actions. Open that flow and copy the first two actions (the two after the trigger) and past them into the deployment flow. Update the requestor parameter with the Primary email from the second pasted action. The image below should make things a bit more clear.

Now, resubmit the failed run. You should get an approval in the Approvals app in Microsoft Teams. After you approve it, the flow should finish successfully. You should see the stage change in the Deployment Pipelines Configuration app (see image below) as well from the developer side in the solution pipeline. Once succeeded, your solution is deployed in the production environment.

Service Principal versus Service account
We have now deployed the solution in a delegated way using a service principal. This is one of the big improvements since my initial test. Although having a service principal being the owner of a flow is ideal security-wise, it does have have unfortunately licensing implications. This Learn section describes it quite clearly. Instant flows that have been setup to run as the run only user, or have a Power Apps trigger, will consume the user's license. No problem here. All other flows (e.g. automated/async flows) will require a per flow license (a.k.a. a pricey option). This can add up quite fast if you have multiple async flows running. This means that probably in most cases the Service account option will be the option of choice. This isn't Managed Environment / Pipelines in Power Platform only, but good to be aware of.
Pipelines in Power Platform versus ALM Accelerator
If you deploy a solution that contains Connection references and Environment variables, the Pipelines in Power Platform interface will fetch these solution items and ask you to share the connection and specify the values for the environment variables in the target environment.

The good thing of the Pipelines in Power Platform is that it is easy to find for the developers, right in the solution they are working in. This definitely is a big advantage over the ALM Accelerator, which is a separate Canvas app for the developer.
An aspect where the ALM Accelerator (as is) is still superior is granting access to the assets you create. As you can see from the image below, you see a few more options besides the Connection References and Environment Variables. This is the Deployment Settings section. We can determine with which user/group a canvas app should be shared, define Group Teams (the teams you define in Dataverse) to be created, assign Security roles to it, etc. The pipelines ALM Accelerator uses live in Azur DevOps and take these settings into account. Pretty sweet.

For the Pipelines in Power Platform we need to manage this ourselves. The second flow (from which we copied the two actions) is exactly what this is doing. The problem with this flow is that it only looks at the deployment requestor and shares the Canvas Apps and Power Automate flows with this user. All other users must be managed in a different manner. This will result in some custom solution (time consuming) or manual sharing by the Power Platform (also time consuming and mundane).
This is something where the Pipelines in Power Platform can still improve. That being said, this is mostly done at the initial deployment. After that, sharing and security roles get updated by the solution, but new ones aren't created as often. So all in all, at the current stage it is a pretty solid option to facilitate ALM. Let's look at the other new update which is quite interesting.
Extend pipelines in Power Platform
Another pretty cool feature is that we can extend the Pipelines we create with Power Automate flows. Practically, this means we can add steps to the Deployment process at two steps in the deployment process:
Pre-export step
Pre-deployment step
There are some sample flows available. The actions are shown, but it is a bit limited. Me and my colleague Thomas van der Waard were thinking on how we could use this capability.
We came up with the idea to check if the solution has unmanaged layers in the target environment. We don't want that, as it will or might not show the updated asset. Although recently a new feature was announced that can block unmanaged customizations as a whole, we think it is still interesting. In a test/validation environment you might want to be able to quickly create an unmanaged layer to see it that does the trick. But this layer must be removed before you create a new deployment. So the pre-export step should check if there are unmanaged layers for the assets in our solution. if yes, the deployment should be cancelled. That is what we are about to create.
Update your pipeline
Update the Deploy to test stage of your pipeline. Just check the Pre-Export Step Required checkbox.

Create a new solution in your host environment named Pipelines customizations.
Create a new Automated cloud flow and name it Pipelines Pre-Export Step
Give it the Dataverse trigger When an action is performed
Here you can find the corresponding Step Started trigger. For our pre-export step this is the OnDeploymentRequested. Your trigger should look like the image below.

We now want to check if there are some unmanaged layers for our solution components. In order to make this work, you need to understand a bit of how your solution is stored in Dataverse, and where the unmanaged layer components reside.
Each environment has a table solutions. This is where you should be able to find your solution. a related table is named Solution Components, which contains all the components of your solution. This is actually also where you can find the unmanaged items. The solution where these components will be linked to is named Active.
That means that if we retrieve all the solution components of our solution we want to deploy, none of these components IDs should be linked to the Active solution. Can you create this flow yourself? That is quite a step, so I have added an unmanaged solution for you. See how I created it an try to recreate it yourself.
Did you manage to make it work? Let me know!
Final thoughts
Pipelines in Power Platform now really is a good product. We can easily create pipelines, have delegated deployments, and extend these pipelines. Although still a bit complex, I think for the vast majority of Power Platform developers it's much more easy to create a Power Automate flow rather than creating yaml pipelines in Azure DevOps. What I also really like about Pipelines in Power Platform over the ALM Accelerator is that it allows you to gradually improve your ALM process. You can make it work without too many technical know-how. When the Power Platform footprint of an enterprise grows, you might want more from these Pipelines, and extend it to GitHub Actions for instance.
Yes, Managed Environments require premium licenses. I think that if you want to start using ALM, you probably want to stay away from SharePoint, thus you require licenses anyways. The easy it offers, plus the earlier discussed Catalog feature really makes Managed Environments an interesting offer.
In our next challenge we will round up our Managed Environments adventure.
Additional Information
We have created some Managed Environments. If you want to redo this, you will need to use the PAC CLI. There is no way yet to do this is the Admin Center unfortunately. If you haven't used the CLI before, Install it by installing the Power Platform Tools extension for Visual Studio Code. Then you can create a new terminal and run the command below (after you update the environment GUID).
pac admin set-governance-config -env 00000000-0000-0000-0000-000000000000 -pl BasicYou can create different pre-export step flows for different solutions, pipelines, or stages. You can achieve this with Trigger conditions.
Key Takeaways
👉🏻 Pipelines in Power Platform matured over the last year into a viable option
👉🏻 ALM Accelerator still has more capabilities, but also requires more skills
👉🏻 We can extend the pipelines with Power Automate flows ♥
👉🏻 Managed environments are something to actively consider for your environment strategy
Opmerkingen